Working with Inverse Kinematics
Gain fine-tuned control of objects that are connected by joints.
Overview
Inverse kinematics (IK) is the use of equations to drive a system of connected components so that an end effector can reach a desired position. Imagine a robot arm formed of a series of sections hinged together. With traditional animation techniques, if you wanted the hand of the arm to reach to a specified position, you would have to code the rotations for each of the joints, which is a complex and time-consuming task. With IK, you simply need to specify the required position of the hand (which would be the end effector), and each individual joint is rotated to achieve the final position. In SpriteKit, complex IK animations can be generated with very little code.
Set Up the Joints and Constraints
SpriteKit’s IK relies on two classes:
SKActionobject reach methods that solve an IK system (that run the system to make the end effector reach a specified position).SKConstraintobjects that constrain the position or orientation of nodes.
This code creates a simple robot arm consisting of a fixed shoulder node and upperArm, midArm, and lowerArm sections that are joined by elbow and wrist nodes. At the end of the wrist is an endEffector node. The nodes are progressively children of each other.
The shoulder node is fixed to the scene with a constraint, and the other joints are offset in the y direction by the length of each section.
let sectionLength: CGFloat = 100
let sectionRect = CGRect(x: -10, y: -sectionLength,
                         width: 20, height: sectionLength)

let upperArm = SKShapeNode(rect: sectionRect)
let midArm = SKShapeNode(rect: sectionRect)
let lowerArm = SKShapeNode(rect: sectionRect)
let shoulder = SKShapeNode(circleOfRadius: 5)
let elbow = SKShapeNode(circleOfRadius: 5)
let wrist = SKShapeNode(circleOfRadius: 5)
let endEffector = SKShapeNode(circleOfRadius: 5)

scene.addChild(shoulder)
shoulder.addChild(upperArm)
upperArm.addChild(elbow)
elbow.addChild(midArm)
midArm.addChild(wrist)
wrist.addChild(lowerArm)
lowerArm.addChild(endEffector)

shoulder.constraints = [SKConstraint.positionX(SKRange(constantValue: 320),
                                               y: SKRange(constantValue: 320))]

let positionConstraint = SKConstraint.positionY(SKRange(constantValue: -sectionLength))
elbow.constraints =  [ positionConstraint ]
wrist.constraints = [ positionConstraint ]
endEffector.constraints = [ positionConstraint ]
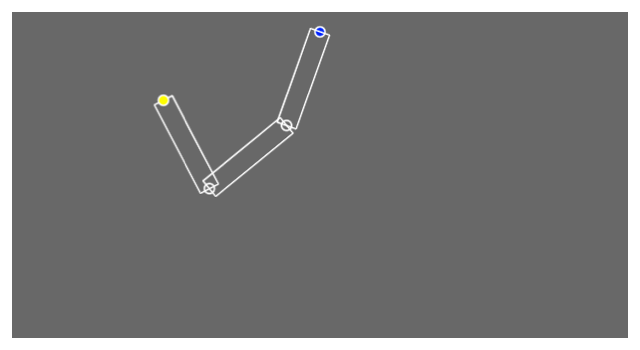
In its default position, the code above creates a node tree that looks like this (the shoulder is at the top, in blue, and the end effector is at the bottom, in yellow).

Run the Solver
To run the IK solver, you create an action passing it the desired location.
let reachAction = SKAction.reach(to: location,
                                 rootNode: shoulder,
                                 duration: 1.0)

endEffector.run(reachAction)
Given a location to the left of and slightly below the shoulder, the action finishes with the node tree looking like the following: